DIY Bathroom Vanity Makeover: Step-by-Step Guide to Painting Your Vanity
Are you tired of your outdated bathroom vanity and ready for a fresh new look? Whether you're a seasoned DIY enthusiast or just starting your home improvement journey, a bathroom vanity makeover can be a rewarding project that adds both style and functionality to your space. You don’t have to rip out what you have and bring in new.
In this blog, I’ll guide you through the steps to revamp your vanity with a focus on cost-effective materials and techniques. I’ll share some before and after of 3 vanities that we painted and added new hardware to. But first, let's take a moment to appreciate some fun facts about the history behind these essential bathroom fixtures.
A Brief History of Bathroom Vanities
Did you know that the concept of a bathroom vanity has evolved dramatically over the centuries? In the pre-plumbing era, washstands were the norm. These small wooden tables, equipped with a pitcher of water and a bowl, were a far cry from the sophisticated vanities we know today. As indoor plumbing became more widespread during the Victorian era, washstands gave way to wall-mounted sinks with separate taps for hot and cold water. Fast forward to the post-war modernization period, and you'll find vanities with integrated countertops and built-in storage, often made from easy-to-clean materials like Formica and laminate.
Modern Bathroom Vanity Trends
Today, bathroom vanities have become a focal point of design and innovation. From sleek floating vanities to rustic reclaimed wood designs, there's a style to suit every taste. And with high-tech features like touchless faucets and built-in Bluetooth speakers, modern vanities offer more than just a place to wash your hands.
Step-by-Step Guide to a DIY Bathroom Vanity Makeover
Materials and Tools You'll Need:
Sandpaper (120 and 220 grit)
Painter's tape
Primer (stain-blocking)
Paint (cabinet-grade)
Paintbrushes and rollers
New hardware (optional)
Drop cloths or plastic sheeting
Screwdriver
Cleaning supplies

Step 1: Preparation
Clear the Area: Remove all items from your vanity and place a drop cloth or plastic sheeting on the floor to protect it.
Remove the Doors: Use a screwdriver to remove the doors from the vanity. This makes painting easier and ensures you get an even coat on all surfaces. It also prevents the doors from sticking to the frame during the drying process.
Clean Thoroughly: Wipe down the vanity with a gentle cleaner to remove any dirt, grease, or residue.
Remove Hardware: Use a screwdriver to remove handles, knobs, and any other hardware. This will make painting easier.
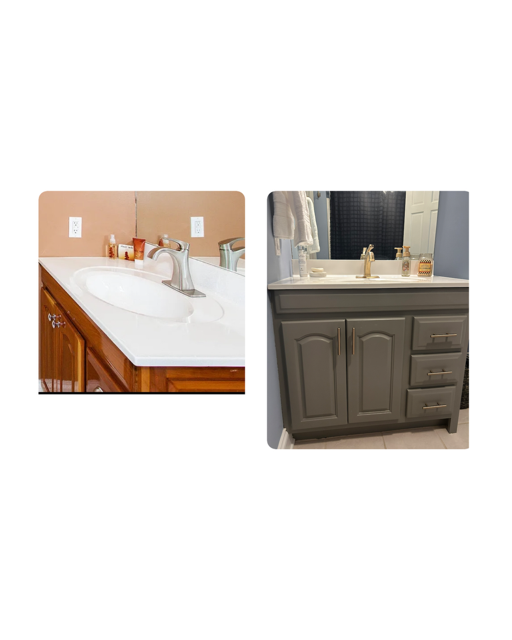
On the left you can see the original vanity cabinet color. On the right is the “After” with new paint and champagne bronze hardware. For paint - we chose Valspar Semi-Gloss - Chelsea Gray HC-168 Cabinet & Furniture Oil-Enriched Enamel paint
Step 2: Sanding
Initial Sanding: Use 120-grit sandpaper to roughen up the surface of the vanity. This helps the primer adhere better.
Smooth Finish: Follow up with 220-grit sandpaper to smooth out the surface. Wipe away dust with a damp cloth.
Step 3: Priming (Don't Skip This Step!)
While some people might choose to skip primer and go straight to painting after sanding, I strongly recommend never skipping the primer. Primer is crucial for several reasons:
Adhesion: Primer helps the paint adhere better to the surface, ensuring a long-lasting finish.
Stain Blocking: Primer blocks any stains or tannins in the wood from bleeding through the paint, which can ruin the appearance of your finished vanity.
Smooth Surface: Primer helps to create a smooth and uniform surface, making your paint job look more professional.
Apply Primer: Use a stain-blocking primer to cover the entire vanity. This helps to seal the wood and prevent any stains from bleeding through the paint.
Drying Time: Allow the primer to dry completely according to the manufacturer's instructions.
We used Sherwin Williams Cabinet, Door, & Trim Primer. It dries in 30 minutes, levels nicely, and leaves a smooth surface for paint. (note: Sherwin Williams is not sponsoring - we love their product).
Step 4: Painting
First Coat: Apply the first coat of cabinet-grade paint using a high-quality brush or roller. Be sure to use even strokes and avoid drips.
Drying and Sanding: Allow the first coat to dry, then lightly sand with 220-grit sandpaper to ensure a smooth finish. Wipe away dust.
Second Coat: Apply a second coat of paint for full coverage. Allow it to dry completely.

Before & after of one of our bathroom vanity makeovers. We chose Valspar Cabinet & Furniture Oil-Enriched Enamel Pain Semi-Gloss Tricorn Black HGSW1441. We added champagne bronze pulls and black faucets for the win. I love this bathroom!
Step 5: Finishing Touches
Reattach Hardware: Once the paint is fully dry, reattach the hardware or replace it with new handles and knobs for a fresh look.
Reattach the Doors: Make sure to let the doors dry for at least 24-48 hours before reattaching them to ensure they don't stick to the frame. This ensures the paint is fully cured and prevents any damage to your hard work.
Final Cleanup: Clean up any stray paint drips or marks and remove the drop cloths.
Design Ideas and Tips
Two-Tone Look: Consider painting the vanity base one color and the drawers/doors another for a stylish two-tone effect.
Add New Hardware: Swapping out old hardware for modern handles and knobs can instantly update the look. We chose to add new hardware for an updated look. (see before and after pics)
Decorative Touches: Add decorative trim or moldings to the vanity doors for an elegant touch.
With a bit of time and effort, you can transform your bathroom vanity into a stunning centerpiece that reflects your personal style. Embrace the history of bathroom vanities while adding your own creative twist, and enjoy the satisfaction of a successful DIY project. Happy painting my friends! Please comment or visit my contact page to message me.

This vanity is the master bath double sink vanity. On the right is the finished product. We chose Valspar Cabinet & Furniture Oil-Enriched Enamel Paint - Brown Velvet1011-10 - Satin sheen.